


ChatGPT is a chatbot launched by OpenAI, It can generate questions to your answers within its knowledge, We'll be using it to build a Pizza delivery service, and if the results we get from it aren't what we expect, then we are going to tweak them to our liking.
You can easily set up an account by following this link.
Pizza delivery is a highly competitive and demanding industry, with customers expecting fast, accurate, and reliable service. The ability to quickly and efficiently fulfill orders is key to success in this market. In this guide, we will outline the steps and considerations involved in creating a pizza delivery service with chatGPT
Getting Started
Setting up codebase
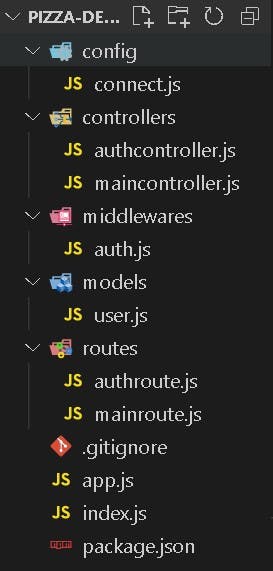
We'll be using ChatGPT and Node.js to build the Pizza delivery service, You need to setup your codebase, After running npm init -y in your terminal, You can easily create folders and files by running this command below in your terminal:
mkdir config controllers middlewares models routes
touch config/connect.js controllers/maincontroller.js controllers/authcontroller.js middlewares/auth.js models/user.js routes/mainroute.js routes/authroute.js .gitignore app.js index.js
Creating your server
Now you want to create a server with express.js this can be easily done by adding this code into the app.js file :
import express from "express";
import cors from "cors"
import connect from "./config/connect.js";
import authroutes from "./routes/authroute.js"
import mainroutes from "./routes/mainroute.js"
const app = express()


app.use(connect)
app.use(
    express.urlencoded({
      extended: false,
    })
  );

app.use(cors())
app.use(express.json());
app.use(authroutes)
app.use(mainroutes)
export default app
And This in your index.js file :
import "dotenv/config"
import app from "./app.js";
const port = process.env.PORT


app.get("/", (req, res) =>{
    res.send("Pizza delivery service")
})

app.listen(port, () =>{
    console.log(`app is running at ${port}`)
})
Installing dependencies
You'll be installing all dependencies needed by running this command below in your terminal :
npm i mongoose dotenv express jsonwebtoken bcryptjs nodemon
Now you'll add "dev": "nodemon index.js" to scripts in package.json file and "type": "module", the former is for the server to restart automatically and the latter is to enable ES6 modules, your package.json file should look like this:
{
  "name": "pizza-delivery-service",
  "version": "1.0.0",
  "description": "A pizza delivery service built with chatGPT",
  "main": "index.js",
  "scripts": {
    "test": "echo \"Error: no test specified\" && exit 1",
    "start": "node index.js",
    "dev": "nodemon index.js"
  },
  "keywords": [],
  "author": "",
  "license": "ISC",
  "dependencies": {
    "bcryptjs": "^2.4.3",
    "cors": "^2.8.5",
    "dotenv": "^16.0.3",
    "express": "^4.18.2",
    "jsonwebtoken": "^9.0.0",
    "mongoose": "^6.8.3",
    "nodemon": "^2.0.20"
  },
  "type": "module"
}
Creating a .env file and adding necessary environment variables
In your .env file you are going to add
Mongo DB URI
JWT SECRET KEY
PORT Number
You can add all of them by copying this code below :
MONGO_URI_LOCAL=mongodb://127.0.0.1:27017/pizza-delivery
JWT_SECRET_KEY=e98f6a81f9d84b6d7b6a9a0a04dfc5d5f5f1761f0b827dd2db9e5b5e5fae58f
PORT=8080
Note: I am using Local MongoDB on My computer.
Connecting to your database
You can easily connect to your database using this code below :
import express from "express";
import mongoose from "mongoose";
import "dotenv/config";
const app = express();

mongoose.set("strictQuery", false);

mongoose
  .connect(process.env.MONGO_URI_LOCAL, {
    useNewUrlParser: true,
    useUnifiedTopology: true,
  })
  .then(() => console.log("DB Connected!"))
  .catch((err) => {
    console.log("not able to connect to database"+ err);
  });

export default app;
Creating Schema
Creating a user schema
Now we want to create a schema in the user.js file, I sent create a schema that contains email, name, role and address in mongodb and it gave me this :

As we stated above that we'll be using module, you'll just need to change const mongoose = require('mongoose'); to import mongoose from "mongoose"; and the last line to export default mongoose.model("User", UserSchema)
Creating an order schema
Now we want to create an order schema, you'll create a new file and name it order.js in the models folder, you can easily do that by running this command in your terminal :
touch models/order.js
To Create the order schema i sent create an order schema that includes customer, pizza, size, createdAt and status where customer is referencing user and pizza has enum containing 'Neapolitan Pizza', 'Chicago Pizza', 'Sicilian Pizza', 'Greek Pizza', 'Detroit Pizza', size has enum containing 'small', 'medium', 'large' and status has enum containing 'pending', 'in progress', 'completed' To chatGPT and i got this :
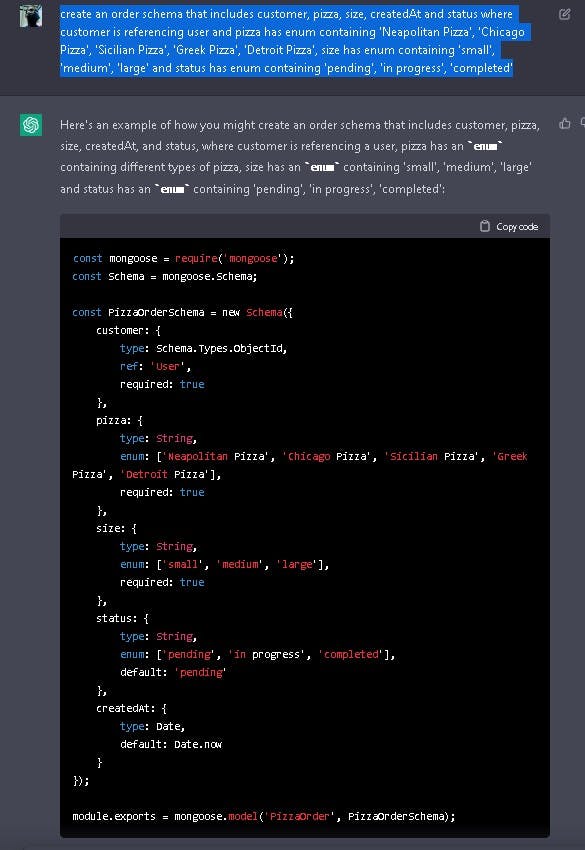
Since the type is module, you'll just need to change const mongoose = require('mongoose'); to import mongoose from "mongoose"; and the last line to export default mongoose.model("PizzaOrder", PizzaOrderSchema)
Creating SignUp and SignIn controller
Signup Controller
Now I'll tell chatGPT to build a signup controller for me letting it know all the tools I'm using let's see how well it does.
We want to make sure only two roles are available in the service that is the delivery personnel and the user role
Note: We are creating these two roles alone to keep it simple.
User: Is going to order the type of pizza they want among the five main types our service offers
Delivery Person: Is going to get the order and deliver the pizza to the user's address.
Note: I told chatGPT my Javascript is module based.
I sent create a signup controller that checks if a user exists, if they don't exist create a new user collecting their email, name, role and address and then create a JWT with user id and email in payload and JWT_SECRET_KEY as secret key to chatGPT and it gave me this

SignIn Controller
Now I'll tell chatGPT to build a SignIn controller, Let's see how well it does.
Before we continue I forgot to add password to the user schema and also save the encrypted password into the database from the signup controller so I'm going to add this code to the user.js file in the UserSchema declaration:
password: {
        type: String
    }
And Add this in the signup controller Below the If statement checking if the user exists:
const password = req.body.password;
const encryptedPassword = await bcrypt.hash(password, 12);
And then add password: encryptedPassword into the schema instance making the complete User schema instance look like this :
const user = new User({
            email: req.body.email,
            name: req.body.name,
            role: req.body.role,
            address: req.body.address,
            password: encryptedPassword
        });
I sent build a signin controller that checks if a user exists, if they do check if the password matches with bcryptjs, if does create a JWT with id and email in payload and send it as a response to chatGPT and it gave me this :

Testing SignUp and SignIn endpoints
Testing Signup endpoint
To be sure we are on the right path we'll test the controllers built so far before starting the main service.
I sent Create a route for the signup controller with endpoint name set to signup using module type to chatGPT and it gave me this

I'll add this code above into my authroute.js file, then in the app.js I'll add these below
import authroutes from "./routes/authroute.js"

app.use(authroutes)// this below app.use(express.json())
I tested the endpoint and it worked fine as seen below :

Testing SignIn endpoint
I imported SignIn controller and then created /signin endpoint using router this way :
import {signup, signin} from '../controllers/AuthController.js';

router.post('/signin', signin);
I tested the endpoint and it also worked fine :

Creating controllers for the Pizza service
Get all pizzas controller
This controller will be connected to an endpoint that shows users all the types of pizzas we have, you'll add this into the maincontroller.js file
I sent if all pizzas available are 'Neapolitan Pizza', 'Chicago Pizza', 'Sicilian Pizza', 'Greek Pizza', 'Detroit Pizza' create a controller to list all of them to chatGPT I got this :

Create Order Controller
This is the controller that'll be used to create a new pizza order, I sent Write a controller where a user can order pizza referencing the customer to userid, collecting the type of pizza they want, the size, setting the status to pending and setting createdAt to the time the order was created in module js And I got this :

This code above will also be added into the maincontroller.js file.
View Pending Orders
Before we go any further I remember I didn't add the role as a payload in the JWT, so I'm going to do that in the SignUp and SignIn controller like this :
const token = jwt.sign({ id: user._id, email: user.email, role: user.role }, JWT_SECRET_KEY);
The pending orders controller will be used to see all pending orders, I sent write a controller so the delivery man and user can see all pending orders and I got this :

This also will be added into the maincontroller.js file.
Update Status as a delivery personnel
This is the controller the delivery personnel will use to update the order status, I sent write a controller to check if the role is delivery personnel and then update order status and I got this :

This also will be added into the maincontroller.js file.
Creating and Testing Pizza Service endpoints
Now we want to create endpoints for all the pizza delivery service controllers we created earlier, I sent The createOrder, getPizzas, getPendingOrders and updateOrderStatus is in "../controllers/maincontroller.js", the verifyToken is in "../middlewares/auth.js" create endpoints for them according to their paths to chatGPT and i got this :

Since I created endpoints for SignIn and SignUp earlier, I'll Delete the endpoints for them.
I added all of these into the mainroute.js file, The next thing I want to do is connect the mainroute.js file to the app.js file so all the endpoints can be accessible.
You can do that easily by adding the lines of code below into the app.js file :
import mainroutes from "./routes/mainroute.js"

app.use(mainroutes)//below app.use(express.json());
Testing Get Pizzas Endpoint
I tested the /pizzas endpoint and it worked fine as seen below :

Testing Create Order Endpoint
I inserted the JWT in the header with the x-access-token as the key, You may be wondering what function is checking the JWT, I have this code already in my "../middlewares/auth.js" file :
import jwt from "jsonwebtoken";

const config = process.env;

export const verifyToken = (req, res, next) => {
  const token =
    req.body.token || req.query.token || req.headers["x-access-token"];

  if (!token) {
    return res.status(403).send("A token is required for authentication");
  }
  try {
    const decoded = jwt.verify(token, config.JWT_SECRET_KEY);
    req.user = decoded;
  } catch (err) {
    return res.status(401).send("Invalid Token");
  }
  return next();
};
I then tested the /order Endpoint and it also worked fine as seen below:

Testing Get Pending Orders Endpoint
I created a new account as delivery personnel and then tested the /orders/pending endpoint which gets all pending orders and it also worked fine as seen below :

Testing the update order status endpoint
I Copied the Order Id and set the status to "in progress" then tested the /order/:id and it worked fine as seen below :

Conclusion
So you've come this far. In my opinion, chatGPT did well, I edited a few things like the file extensions when I received errors.
I added
.jsto files to the files I importedI deleted the signIn and signUp controller that was repeated
But Generally, It did very well asides from these.
You may want to play with the code or improve some sections, The complete source code is available Here
“Experience is the name everyone gives to their mistakes.” – Oscar Wilde
You can check more on chatGPT Here
Thanks for reading
Follow me on Twitter, GitHub or LinkedIn for more backend development tips.